Create MongoDB database using Node JS

Okay, it’s time to create a database. Go to the database website by clicking here. There are two ways to install the database:
- Download the file and install it: Remember, MongoDB is cross-platform, so it works on Windows, Linux, and everywhere.
- Use a managed database service: You can ask MongoDB to host and manage your data.
There are also two versions of MongoDB:
- Community version: This is free and available for developers to use.
- Enterprise version: This is for large companies, and you need to pay for it.
This version corrects the grammar while keeping the content clear and simple. Let me know if you'd like further adjustments!
Self-Managed vs Mongo-Managed
With self-managed, you install, back up, and host everything yourself — that’s what self-manage means. But let's use the second approach where MongoDB manages everything. So, in this blog or notes (whatever you want to call it), we are using the MongoDB Managed version. If you want to know how to manage it yourself, plant a seed by writing a blog here. You can get started by clicking here.
Installing MongoDB
After clicking on download or installing Atlas, you’ll be asked to fill out a form with 2-3 fields. Fill that in, then proceed to the next step. Since this database is managed by MongoDB, they might adjust the setup based on your requirements. Rename your cluster — it’s currently named Cluster 0, but you’ll need to identify it later.
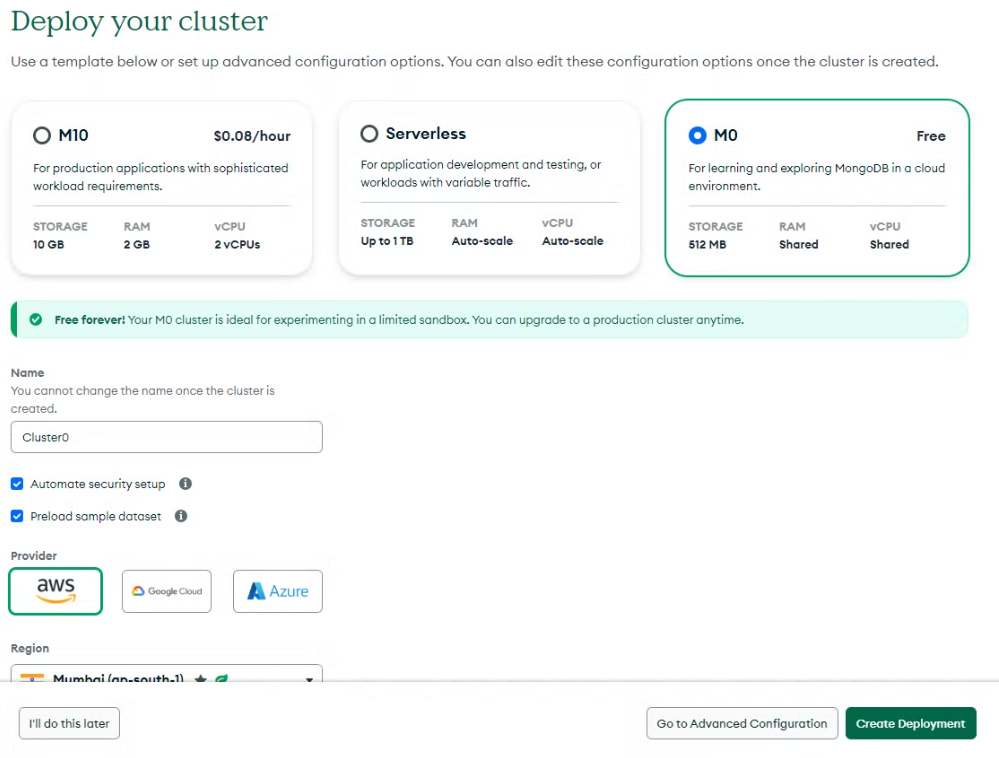
Click on free MO — remember in the last blog we learned that the server is hosted in a location? Check if Mumbai is written there. After clicking Create Deployment, a dialog will appear. Copy your username and password. You can create multiple users or just click on the Create a Connection Method button, where you can find your cluster name. As you can see in the screenshot, your cluster is created. Now, to use it, click on Connect. Remember, the website interface might look different depending on when you're using it, but the same keywords and steps apply consistently.
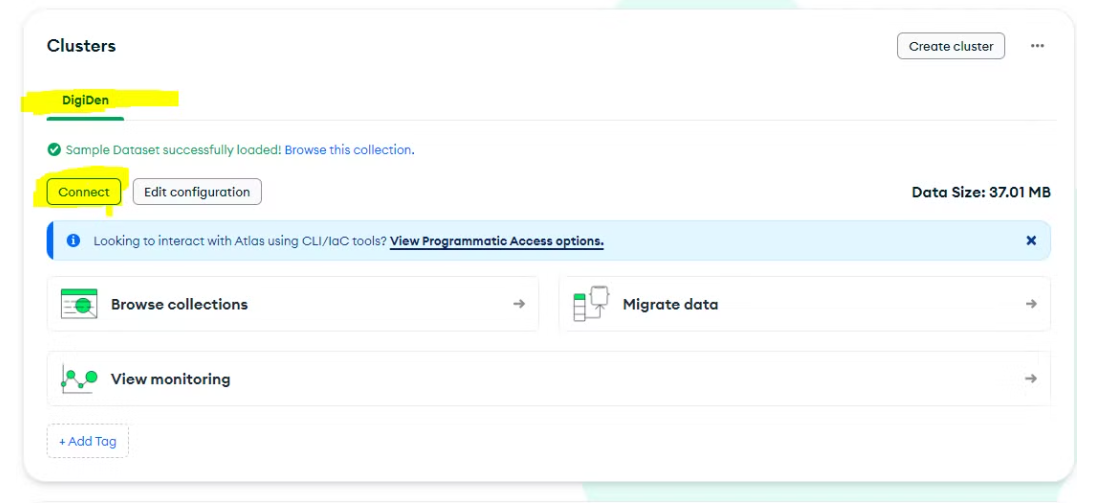
After clicking Connect, choose your driver. You should have a username and password; if not, create them in the dialog by clicking Connect. Copy the connection string and paste it into your file. We will create a database.js file and paste the string there, just like below. Make sure to replace <db_password> with your actual password.
recap 24:50
const URI= 'mongodb+srv://heyashu:<db_password>@digiden.m6she.mongodb.net/?retryWrites=true&w=majority&appName=DigiDen'
Visualize Database and Connect
To do this, download the software MongoDB Compass to see and manage the database using a GUI. If you want to learn what GUI and CLI mean in Hindi, click here: What is CLI vs GUI.
Or, you can click this link to watch a 1-minute video on how to download MongoDB Compass. Once downloaded, paste the connection string URL you copied earlier and click Connect. You’ll see some sample data. From here, you can create a database directly in MongoDB Compass. Look for the Create Database green button.
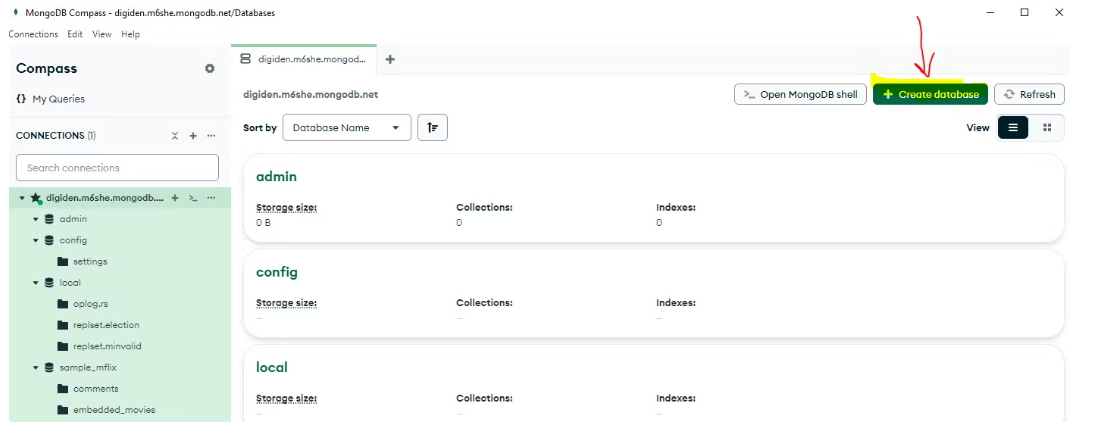
After clicking on Create Database, I named it Notes and created a collection called user. I can see this after clicking on Notes from the sidebar and then clicking on Add Data. You can either import data from a JSON file or write the document (JSON) manually.
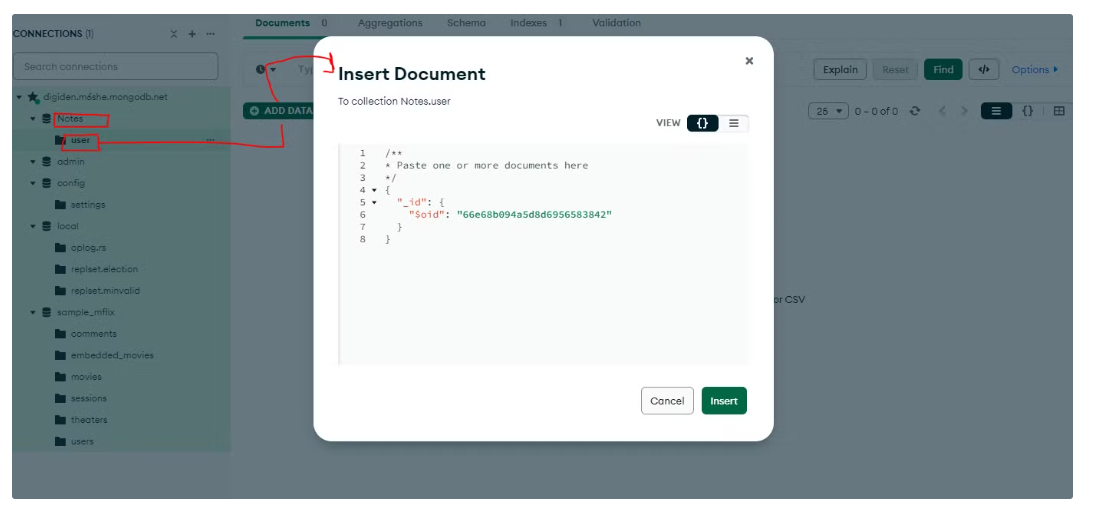
I have added this, and then click insert, so first user is created in Databse Notes and User collection,
/**
* Paste one or more documents here
*/
{
  "firstName" :"heyashu",
  "website" : "heyashu.in",
  "city" :"ayodhya"

}
After clicking insert it will wlook like this, id is auto genreated
_id
66e68c334a5d8d6956583843
firstName
"heyashu"
website
"heyashu.in"
city
"ayodhya"
Now lets read using code
So lets go to editor wherever you have pasted your connection string install MonoDb node js driver using NPM, what is npm
npm install mongodb
It will add node_modules, package.json, and package-lock.json. We will discuss these later. If you’ve already done git init, it means you want to manage this whole code using Git. If not, run git init in your terminal.
git init
then createa file .gitignore and paste
node_modules
In the sidebar, you’ll see many changes. Actually, node_modules contains the code of the packages you installed using npm, but we won’t push that to the Git repo. We need it only for development purposes. The node_modules folder itself is more than 50MB, so it's not good practice to host it. That’s why we add a .gitignore file, and node_modules will be ignored. Don’t worry, we’ll write more on this later. For now, just do it. Let’s focus on the database. Nice, right?
Read the Data
Read Mondo Node Document from here , ok now lets see how to read the data from DB and setup mongo things
Just Paste this code in you JS file, now if you file name is database.js, run node database.js in terminal
// Importing the MongoClient class from the mongodb package
const { MongoClient } = require("mongodb");

// MongoDB connection string (replace <username> and <password> with actual credentials)
const URI =
  "mongodb+srv://<username>:<password>@digiden.m6she.mongodb.net/?retryWrites=true&w=majority&appName=DigiDen";

// Create a new MongoClient instance using the connection URI
const client = new MongoClient(URI);

// Specify the name of the database
const dbname = "Notes";

// Main function to handle MongoDB operations
async function main() {
  // Connect to the MongoDB server
  await client.connect();
  console.log("Connected to MongoDB");

  // Access the database by its name
  const db = client.db(dbname);

  // Access the 'user' collection within the database
  const userCollection = db.collection("user");

  // Fetch all documents from the 'user' collection and convert them to an array
  const findRes = await userCollection.find({}).toArray();

  // Log the results (documents from the 'user' collection)
  console.log("findRes: ", findRes);

  // Return 'Done' when the operation is complete
  return "Done";
}

// Call the main function and handle the results
main()
  .then(console.log("DATA LOGGED")) // Log a message if the function is successful
  .catch(console.error) // Log any errors if they occur
  .finally(() =>


  //output
/* findRes:  [
  {
    _id: new ObjectId('66e68c334a5d8d6956583843'),
    firstName: 'heyashu',
    website: 'heyashu.in',
    city: 'ayodhya'
  }
] */
Insert the data
Now you read the data suppose you want to insert the data now in our Collection
 // insert the data
    const newData={
      firstName: "Mohan",
      website:'heyashu.in/digital-garden',
      city:'Ayodhya-2'
    }


    const insertResult= await userCollection.insertMany([newData])
    console.log("insertResult",insertResult);

    // now try to read the data as befor eyou will get
    //OUTPUT
    /* [
  {
    _id: new ObjectId('66e68c334a5d8d6956583843'),
    firstName: 'heyashu',
    website: 'heyashu.in',
    city: 'ayodhya'
  },
  {
    _id: new ObjectId('66e6a4c72f5bc23db4698a68'),
    firstName: 'Mohan',
    website: 'heyashu.in/digital-garden',
    city: 'Ayodhya-2'
  }
]*/
Later, we will see:
- How to index
- How to update the data
- How to delete the data
- Read what is FindCursor
Continue Exploring
Want me to write notes on a course?
Tell me the course, book, or research topic you want covered. If it helps learners, I'll consider adding structured digital notes for it in the garden.
Have a notes collection to feature here?
Do you have open notes you want featured in this digital garden? Let me know — we can collaborate and publish them for learners worldwide.
Having a doubt? Ask a query?