HTTP Headers Methods Status Codes and Rest API Deep Dive

If you are a junior developer, a senior developer, or just a complete newbie, this is going to be a great place to learn about REST APIs—what they are, why they are used, and how they work. This is going to be a long blog, so it’s for serious readers. If you prefer short TikTok-like videos for instant information, this might not be for you. Let’s get started!
What We Will Learn in This Blog
-
What is a REST API?
-
Why do we use it?
-
The building blocks:
- Understanding URLs
- HTTP Methods
- Headers
- Responses
- Status Codes
-
Building an application
-
Postman usage
-
HTTP 1/2/3
-
Best practices
-
Advanced topics
What is a REST API?
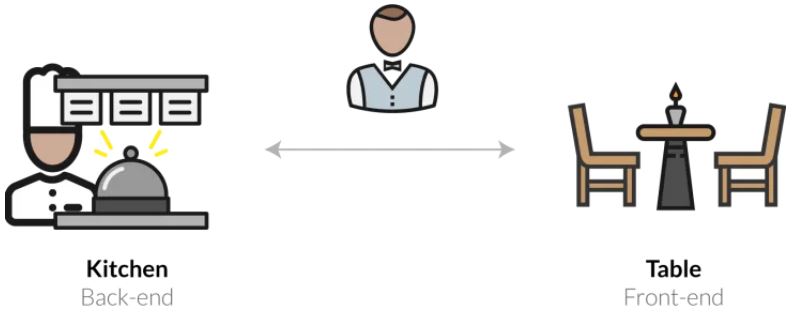
First, let’s understand the frontend and backend in web development using the example of a kitchen.
Overview
The frontend is like the dining area where people eat, and the backend is like the kitchen where everything is prepared. Both are in the same place in a basic setup. Now, imagine if you were handling 100 orders, everything might still run smoothly. But if online orders suddenly increase drastically, things can get messy. Management becomes a problem.
What’s the best solution? Move the kitchen to a separate place. Now, you can simply ask for what you need to serve. The kitchen prepares the food and sends it to the dining area. In this setup, there is a communicator (like a waiter) who takes the client's order and ensures the backend kitchen prepares it.
- If the frontend and backend are in the same place, it’s called a 1-tier architecture.
- If the frontend (dining area) and backend (kitchen) are in different places, it’s called a 2-tier architecture.
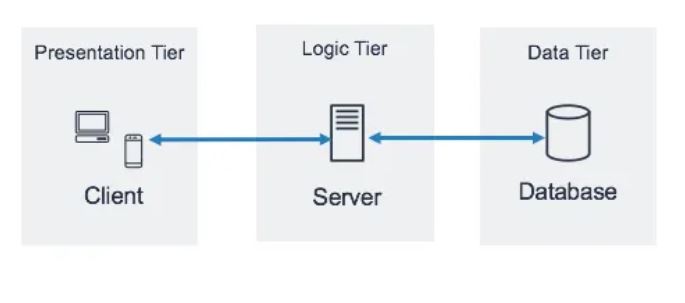
But what happens if the kitchen also has to manage raw materials and storage? It can still get clumsy when scaling. So, the best solution is to move the storage (the database, in web terms) to another place, separate from the kitchen.
Now, we have three separate blocks: the dining area (frontend), the kitchen (backend), and the storage (database). This is called a 3-tier architecture.
So, coming to the API part—communication between the client (frontend) and server (backend) happens through an intermediary, much like how a waiter communicates between customers and the kitchen. This intermediary is called an API (Application Programming Interface). There are different types of APIs, and one of the most widely used is the REST API.
REST (Representational State Transfer): It refers to transferring the "state" of a resource in a representational format. Essentially, the data (state) is represented and transferred using APIs.
My Rules and Protocols
Think about how we present different dishes in a restaurant. Each dish is served in a specific way: momos can’t be served in a bowl meant for dal, and roti can’t be served in a burger box. Similarly, in web communication, there are predefined rules and standards.
In web terms, these rules are called protocols, and one such protocol is HTTP (HyperText Transfer Protocol). It’s the standard set of rules for transferring data over a network.
Benefits of REST APIs
- Ease of Use: REST APIs are simple and straightforward to implement.
- Stateless: The server does not retain any previous information; it simply processes the current request and provides a response.
- Scalability: REST APIs can easily handle increasing loads and scale effectively.
- Flexibility: Supports different formats like JSON or XML, making it highly adaptable.
- Uniform Interface: Provides a consistent way to identify resources (via URLs) and interact with them.
- Caching: REST APIs support caching, improving performance and reducing server load.
- Separation of Concerns: Frontend and backend can use different technologies.
- Interoperability: Language-agnostic, allowing different programming languages to work together.
- Ease of Testing: REST APIs are simple to test using tools like Postman.
- Security: REST APIs provide built-in security features like HTTPS for secure communication.
Explore some dummy and free APIs here! Now, it’s time to dive into HTTP requests and explore their key components.
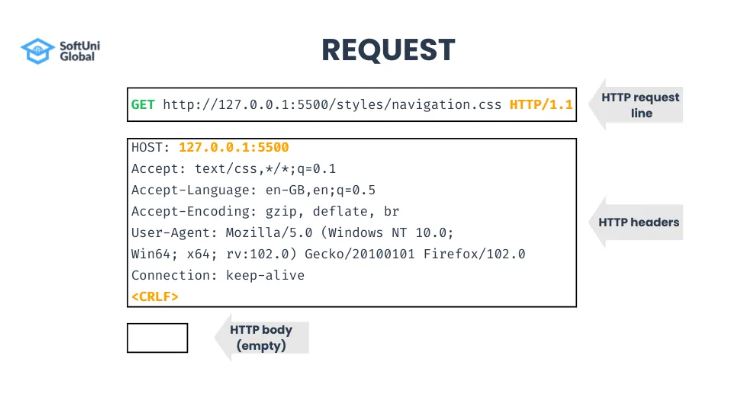
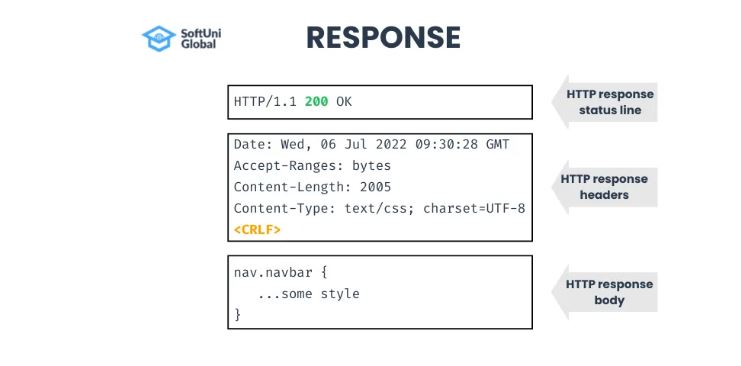
As we have already discussed, there are three main parts of an HTTP request: URL, headers, and body. We will go into the details of each later. For now, let’s focus on how an HTTP response looks.
If you look at the screenshot below, you will see:
- The protocol name and the status code.
- The response headers, which contain server information.
- The main data, which could be in formats like HTML, JSON, or XML.
We will dive deeper into each of these later. For now, just keep in mind that these are the key components of an HTTP response.
Let’s Create a Server
We will use Express.js, which is built on Node.js.
- Open any folder of your choice.
- Open VS Code, Cursive, or any of your favorite editors.
npm init
npm i express -save
Next, go to your entry file, either app.js or index.js, and paste the following code:
import express from "express";

const app = express();

app.all('/',(req,res)=>{
  console.log("Request",req);
  console.log("response",res);
  res.send("hello world");
})

const PORT = 5111;

app.listen(PORT ,listenServer)

function listenServer(){
  console.log("post request running on port "+PORT);
}
In your package.json file (which you got after running npm init), you need to do two things:
- Add a script to run your project.
- Specify the project type as module because you are using ES6 syntax. This tells your project to follow ESM (ECMAScript Modules) instead of CJS (CommonJS).
It’s important to learn about these topics to understand how modules work in Node.js.
{
  "name": "my-first-server",
  "version": "1.0.0",
  "description": "this is simple express js server",
  "main": "index.js",
  "type": "module",
  "scripts": {
    "test": "echo \"Error: no test specified\" && exit 1",
    "start": "node index.js"
  },
  "keywords": [
    "express"
  ],
  "author": "Ashu",
  "license": "ISC",
  "dependencies": {
    "express": "^4.21.2"
  }
}
After that, run npm start and open your browser. Type http://localhost:5111/, and you will see the response sent from your JavaScript code.
We will discuss these things in more detail later, but for now, pick each word and search online to deepen your understanding. Since this is not a backend-focused guide, I’m keeping it brief.
Now, let’s explore URLs!
URL Parts

Let’s dive deep into URLs, as they are the main component when you make a request. Based on different parts of the URL, various services are targeted on the running server.
Breaking Down the URL
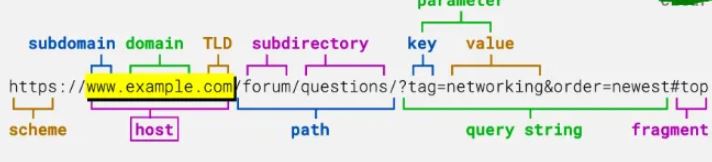
The URL consists of several components, each with a specific purpose:
-
Scheme: This is the protocol, either
httporhttps. -
Host: The host is divided into three main parts:
- Subdomain: For example,
www. - Domain: The name you purchase for your website, like
heyashu. - Top-Level Domain (TLD): The suffix, such as
.in,.com, or.org.
- Subdomain: For example,
-
Path: After the host, the path comes. It indicates what resource or functionality to target. Think of it like the page structure in a frontend application. Similarly, on the backend, paths help target specific functions using subdirectories.
-
Query String: After a
?, the query string begins, continuing until the next#. A query string consists of key-value pairs separated by&. For example:css CopyEdit ?tag=networking&order=newestThe backend uses this data (e.g.,
tag=networkingandorder=newest) to send the appropriate response to the frontend, helping distinguish what data to provide. -
Fragment (#): This stores special information about a page on the frontend. For example, in the URL:
bash
CopyEdit
https://javascript.info/array-methods#splice
The page scrolls directly to the section where the
splicemethod is defined. The#spliceis tied to an element with theid="splice"in the HTML. Note that the fragment is only used on the client side and is never sent to the server.
Example
If you’re building a backend app on http://localhost:5111, and you’re developing a Todo App, the URLs could look like this:
-
To get a list of todos:The
/todospath clearly indicates it will provide the list of todos.bash CopyEdit http://localhost:5111/api/todos -
Similarly, for users:
bash
CopyEdit
http://localhost:5111/api/users
CRUD Operations
CRUD stands for the four basic operations you perform with data:
- Create: Add a new todo.
- Read: View todos.
- Update: Edit existing todos.
- Delete: Remove a todo.
You’ll often hear people talk about “performing CRUD operations.”
HTTP Methods Overview

-
POST: Used to add new data.
-
GET: Used to retrieve data.
-
PUT/PATCH:
- PUT: Replaces the entire set of data.
- PATCH: Edits or replaces a part of the data.
-
DELETE: Used to delete data.
These methods are used by the server to distinguish what action the client wants to perform. The client sends a request, which includes headers and data, either in the body or the URL.
Other methods to be aware of:
- HEAD: Similar to GET, but it only retrieves the headers, not the actual data. We’ll discuss this in more detail later.
- OPTIONS: Used for security purposes. The browser first sends an OPTIONS request before sending the actual request.
- CONNECT: Establishes a connection for faster communication in the future.
- TRACE: Used for diagnostics, to trace the path of requests for troubleshooting.
Serialized Data
Whenever you send or receive data between the server and client, it needs to be serialized. This means you always send stringified data. On both the client and server sides, you need to parse this data.
Now, Let’s Build a Simple Todo App
To demonstrate the use of these methods, we will build a simple Todo Web API with CRUD operations (Create, Read, Update, and Delete). We’ll create four endpoints:
- Create Todo:
POST /todos - Read Todos:
GET /todos - Update Todo:
PUT /todos/:id - Delete Todo:
DELETE /todos/:id
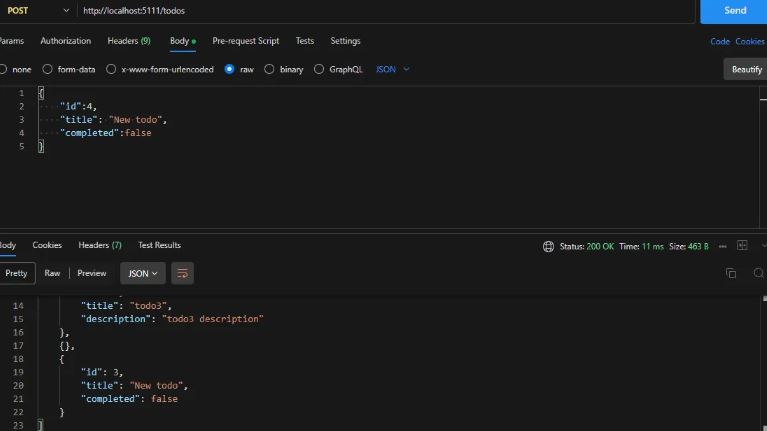
I have updated your app.js to handle these requests. You can use the Postman extension in VS Code to send requests to the API. The browser can only retrieve data, but to send data (like for a POST request), you’ll need to use a tool like Postman or call the API directly with JavaScript.
Example of an Updated index.js
You will need to install some additional packages, such as body-parser and nodemon. These packages help handle requests and automate server restarts during development. You can read more about these packages online.
For the POST requests, you can either use Postman or write JavaScript code to send data. I am pasting the updated app.js code and a screenshot of the Postman tool for you.
Let me know if you need any more details or the code snippet for the app.js!
import express from "express";

const app = express();

import bodyParser from "body-parser";
app.use(bodyParser.json());

app.all('/',(req,res)=>{
  // console.log("Request",req);
  // console.log("response",res);
  res.send("hello world");
})

const PORT = 5111;

app.listen(PORT ,listenServer)

function listenServer(){
  console.log("post request running on port "+PORT);
}

const todos=[
  {id:1,title:"todo1",description:"todo1 description"},
  {id:2,title:"todo2",description:"todo2 description"},
  {id:3,title:"todo3",description:"todo3 description"},
]

// READ
app.get('/todos',(req,res)=>{
return  res.json(todos);
})
// POST
app.post('/todos',(req,res)=>{
  const newTodo=req.body;
  console.log("newTodo",newTodo);
  todos.push(newTodo);
  return res.json(todos);
})
// PUT
app.put('/todos/:id',(req,res)=>{
  const id=req.params.id;
  console.log("id",id);
  const todo=todos.findIndex((todo)=>todo.id==id);
  console.log("todos",todo);
  if(todo==-1){
    return res.status(404).json({message:"todo not found"});
  }
  todos[todo]=req.body;
  console.log("todos updated",todos);
  return res.json(todos);
})
// DELETE
app.delete('/todos/:id',(req,res)=>{
  const id=req.params.id;
  const todo=todos.findIndex((todo)=>todo.id==id);
  if(todo==-1){
    return res.status(404).json({message:"todo not found"});
  }
  todos.splice(todo,1);
  return res.json(todos);
})
// PATCH
Postman Screenshot
Headers

When sending a request, headers are included, and they contain important information for the server. Let's go over some key headers:
- Host: Specifies the origin host to which the request is being sent, i.e., the target endpoint.
- Origin: Indicates the origin host where the request is coming from.
- Referer: Shows the page from which the request originated. For example, if you see that Flipkart was loaded from LinkedIn, the Referer header will indicate that.
- User-Agent: Contains client-related information, such as system details and browser version. This can be useful for server-side handling.
- Accept: Informs the server about the type of response the client expects, such as JSON, text, or XML.
- Accept-Languages: Specifies the preferred languages for the response.
- Accept-Encoding: Informs the server about the encoding algorithms supported by the client, such as gzip, deflate, Brotli, etc.
- Connection: Specifies whether the TCP connection should be kept alive or closed after the request.
- Authorization: Contains authentication tokens or credentials to validate the user.
- Cookies: Allows sending data (like session tokens) to the server for maintaining the user's state.
- If-Modified-Since and Cache-Control: These headers help optimize requests by checking if the resource has been modified and controlling caching behavior.
Here’s an example of a request header from Flipkart when searching for something:
POST /jserrors/1/NRJS-dd5f16cdf95712c6cba?a=1588759528&sa=1&v=1.236.0&t=Unnamed%20Transaction&rst=15889&ck=0&s=c27fe32d75a666e7&ref=https://www.flipkart.com/search&ri=%7B%22fk-cp-zion%22:%226.43.0%22%7D HTTP/1.1
Accept: */*
Accept-Encoding: gzip, deflate, br, zstd
Accept-Language: en-US,en;q=0.9,hi-IN;q=0.8,hi;q=0.7
Connection: keep-alive
Content-Length: 2971
DNT: 1
Host: bam.nr-data.net
Origin: https://www.flipkart.com
Referer: https://www.flipkart.com/
Sec-Fetch-Dest: empty
Sec-Fetch-Mode: cors
cookie: ''
Sec-Fetch-Site: cross-site
User-Agent: Mozilla/5.0 (Linux; Android 6.0; Nexus 5 Build/MRA58N) AppleWebKit/537.36 (KHTML, like Gecko) Chrome/131.0.0.0 Mobile Safari/537.36
content-type: text/plain
sec-ch-ua: "Google Chrome";v="131", "Chromium";v="131", "Not_A Brand";v="24"
sec-ch-ua-mobile: ?1
sec-ch-ua-platform: "Android"
Response Headers
- Date: Specifies the date and time when the response was sent.
- Server: Provides information about the server, such as its version and name. However, revealing this information is generally not recommended for security reasons.
- Content-Type: Specifies the type of data the server is sending, e.g., JSON, HTML, or XML.
- Content-Length: Indicates the size of the response body, in bytes. It helps in calculating the download progress if you’re downloading content.
- Set-Cookie: Informs the client to store cookies for future requests. This allows the server to maintain the client's session state.
- Content-Encoding: Specifies the encoding used for the response content, such as gzip or Brotli.
- Cache-Control, Last-Modified, ETag: These headers help control caching and indicate when the resource was last modified. The ETag is often used for resource validation.
- Expires: Specifies the time when the data will expire, informing the client when it should consider the data as stale.
Here’s an example of a response header from Amazon:
HTTP/1.1 200 OK
Server: Server
Date: Sun, 26 Jan 2025 15:31:39 GMT
Content-Type: application/json
Content-Length: 22
Connection: keep-alive
x-amz-rid: 7T01A36XSQ5M3P528H47
x-amzn-RequestId: b2698d0b-fe0b-436e-9f08-9ec885d6ae25
Access-Control-Allow-Origin: https://www.amazon.in
Content-Encoding: gzip
Access-Control-Expose-Headers: x-amzn-RequestId,x-amzn-ErrorType,x-amzn-ErrorMessage,Date
Access-Control-Allow-Credentials: true
Vary: Origin,Content-Type,Accept-Encoding,User-Agent
Strict-Transport-Security: max-age=47474747; includeSubDomains; preload
Status Codes
Status codes indicate the status of the response when a request is made. They help the frontend handle the data appropriately and notify the user based on the outcome of the request. Each response contains a status code that provides information about whether the request was successful, encountered an error, or requires further action.
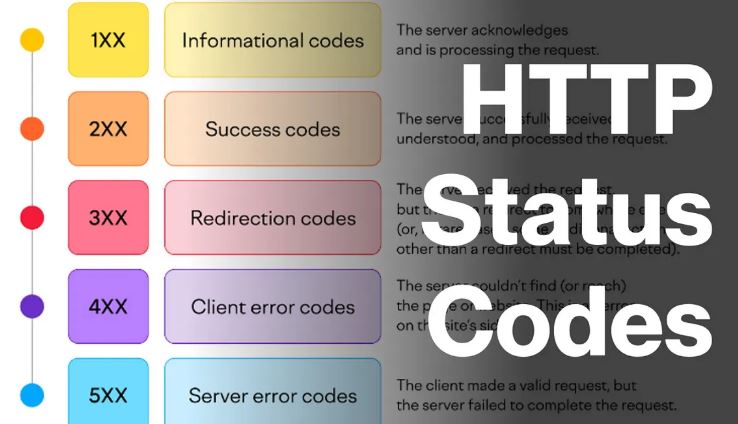
Status Code Ranges
Status codes are categorized into five ranges to represent different types of responses:
-
1XX: Informational
- 100: Continue – The client should continue with its request.
- 101: Switching Protocols – The server is switching protocols.
- These are rarely used but helpful to know.
-
2XX: Success
- 200: OK – The request was successful and the response is as expected.
- 201: Created – A new resource has been created.
- 202: Accepted – The request has been accepted but not yet processed.
- 204: No Content – No content to return, typically after a delete operation.
- 206: Partial Content – The server is returning part of the requested resource (used in cases like file downloads).
-
3XX: Redirection
- 301: Moved Permanently – The resource has moved to a new location.
- 302: Found (Temporary Redirect) – The resource has temporarily moved.
- 307: Temporary Redirect – Similar to 302 but the client should not change the HTTP method used.
- 308: Permanent Redirect – The resource has permanently moved and the method used should not change.
-
4XX: Client Errors
- 400: Bad Request – The request was malformed or contains invalid syntax.
- 401: Unauthorized – The client must authenticate to access the resource.
- 403: Forbidden – The client does not have permission to access the resource.
- 404: Not Found – The requested resource could not be found.
- 405: Method Not Allowed – The HTTP method is not supported for the resource.
- 429: Too Many Requests – The client has sent too many requests in a short period.
-
5XX: Server Errors
- 500: Internal Server Error – The server encountered an unexpected condition.
- 502: Bad Gateway – The server received an invalid response from an upstream server.
- 503: Service Unavailable – The server is temporarily unable to handle the request.
- 504: Gateway Timeout – The server did not receive a timely response from an upstream server.
- 507: Insufficient Storage – The server cannot store the representation needed to complete the request (often used for file uploads).
By understanding these status codes, you can properly handle responses, display the right error messages, and notify users when necessary. It ensures your frontend handles data and errors effectively, improving the overall user experience.